Drlogy
Healthcare organization
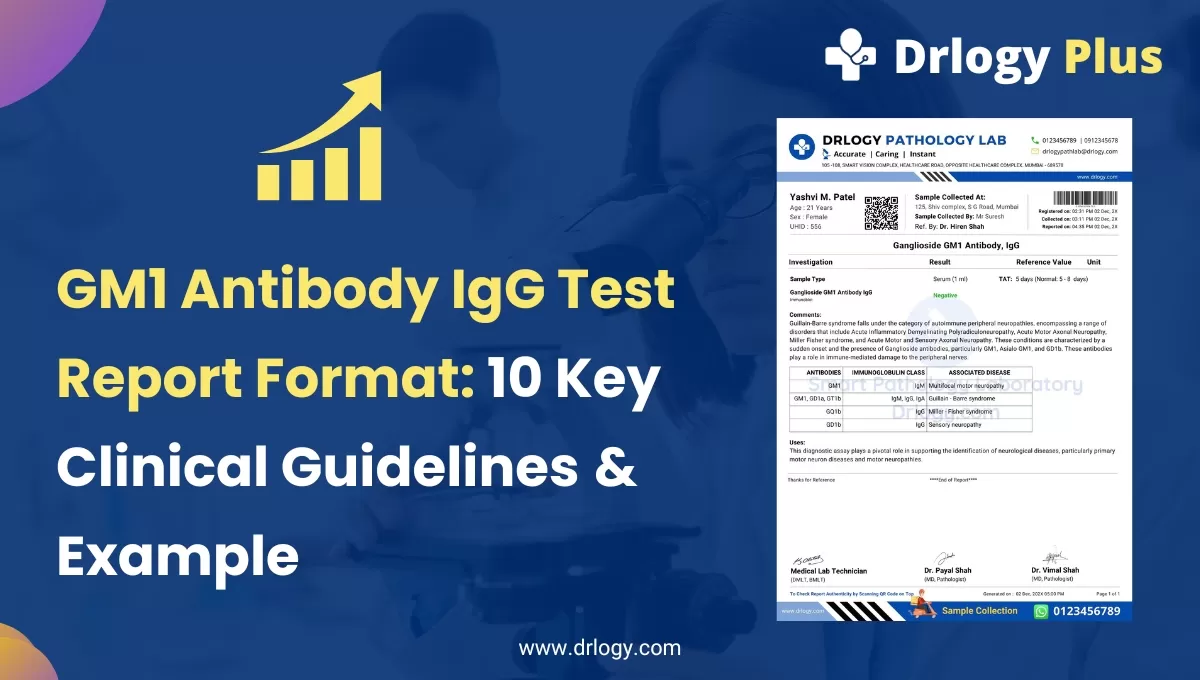
GM1 Antibody IgG Test Report Format: 10 Clinical Guidelines & Sample PDF
The Ganglioside GM1 Antibody IgG Test Lab Report Format is pivotal in the realm of medical diagnostics. This test serves as a crucial tool forentifying IgG antibodies associated with nerve and muscle functions, aiding in the diagnosis of neurological conditions such as Guillain-Barré syndrome.
The report provides comprehensive insights into the presence of IgG antibodies against Ganglioside GM1, a vital component of nerve cell membranes.
Recommended
10 Key GM1 Antibody IgG Test Report Format Clinical Guidelines
Below are the 10 key clinical guidelines for formatting a GM1 Antibody IgG Test report in your pathology laboratory.
1. Patient Information:
- Name: Clearly state the patient's full name.
- Age & Gender: Include age and gender details.
- Date of Birth: Specify the patient's date of birth.
- Contact Information: Provide a contact number for the patient.
- Clinical History: Include relevant medical history for context.
2. Reference Doctor Information:
- Referring Physician: Name and contact details.
- Doctor Letterhead: Ensure the report is on official letterhead.
- Special Instructions: Any specific requests or notes from the referring doctor.
- Referral Date: Mention the date of the referral.
- Referral Reason: Briefly state the reason for referral.
3. Specimen Information:
- Name & Volume: Clearly label the specimen with patient details and volume.
- Collection Details: Include information on the collection process.
- Handling Instructions: Specify temperature or other handling requirements.
- Date of Collection: Clearly state when the specimen was collected.
- Transportation Details: Indicate any special transport conditions.
4. Test Name Heading:
- Clear Testentification: Clearly state the Ganglioside GM1 Antibody IgG Test.
- Test Code: Provide a uniqueentification code for the test.
- Sample Type: Specify the type of sample used (e.g., blood).
- Test Request Date: Mention the date when the test was requested.
- Requesting Department:entify the department or specialty requesting the test.
5. Test Result:
- Concise Reporting: Clearly present the test results.
- Numeric Values: Provide quantitative values if applicable.
- Visual Indicators: Use symbols or colors for easy interpretation.
- Result Units: Specify the units of measurement.
- Critical Values: Highlight any critical findings.
6. Normal Value Reference:
- Negative/Positive Indicators: Clearly define normal and abnormal values.
- Comparison to Reference Ranges: Highlight variations.
- Age-specific References: If applicable, provide age-specific normal ranges.
- Gender-specific References: If applicable, specify gender-related norms.
- Interpretation Notes: Include any additional notes for interpretation.
7. Interpretation & Instrumentation:
- Result Analysis: Interpret the findings in a clinical context.
- Clinical Correlation: Discuss how results relate to the patient's clinical condition.
- Test Limitations: Clearly state any limitations of the test.
- Instrumentation Details: Specify the equipment used.
- Method Validation: Indicate if the test method is validated.
8. Signature and Date:
- Authorized Signatory: Clearly indicate the authorized signatory.
- Date of Report Issuance: Ensure timeliness and accuracy.
- Credential Information: Include credentials of the signing authority.
- Contact Information: Provide contact details for verification.
- Electronic Signature: If applicable, include details of electronic signatures.
9. QR Code Authenticity and Barcode:
- Security Measures: Discuss measures taken to ensure report authenticity.
- Barcode Integration: Utilize barcode technology for efficient tracking.
- Access Controls: Specify who can access the electronic records.
- Encryption Standards: Highlight encryption methods used.
- QR Code Details: Explain the information encoded in the QR code.
10. Diagnostic Laboratory Details:
- Laboratory Name & Logo: Clearly display the lab'sentity.
- Contact Information: Include address, phone, and email details.
- Accreditation Status: Mention any relevant accreditations.
- License Information: Specify the laboratory's license details.
- Working Hours: Indicate operational hours for inquiries.
Also Check
Drlogy Plus For Complete Digital Solutions for Doctors, Clinics, Hospitals & Labs to Enhance Patient Experience
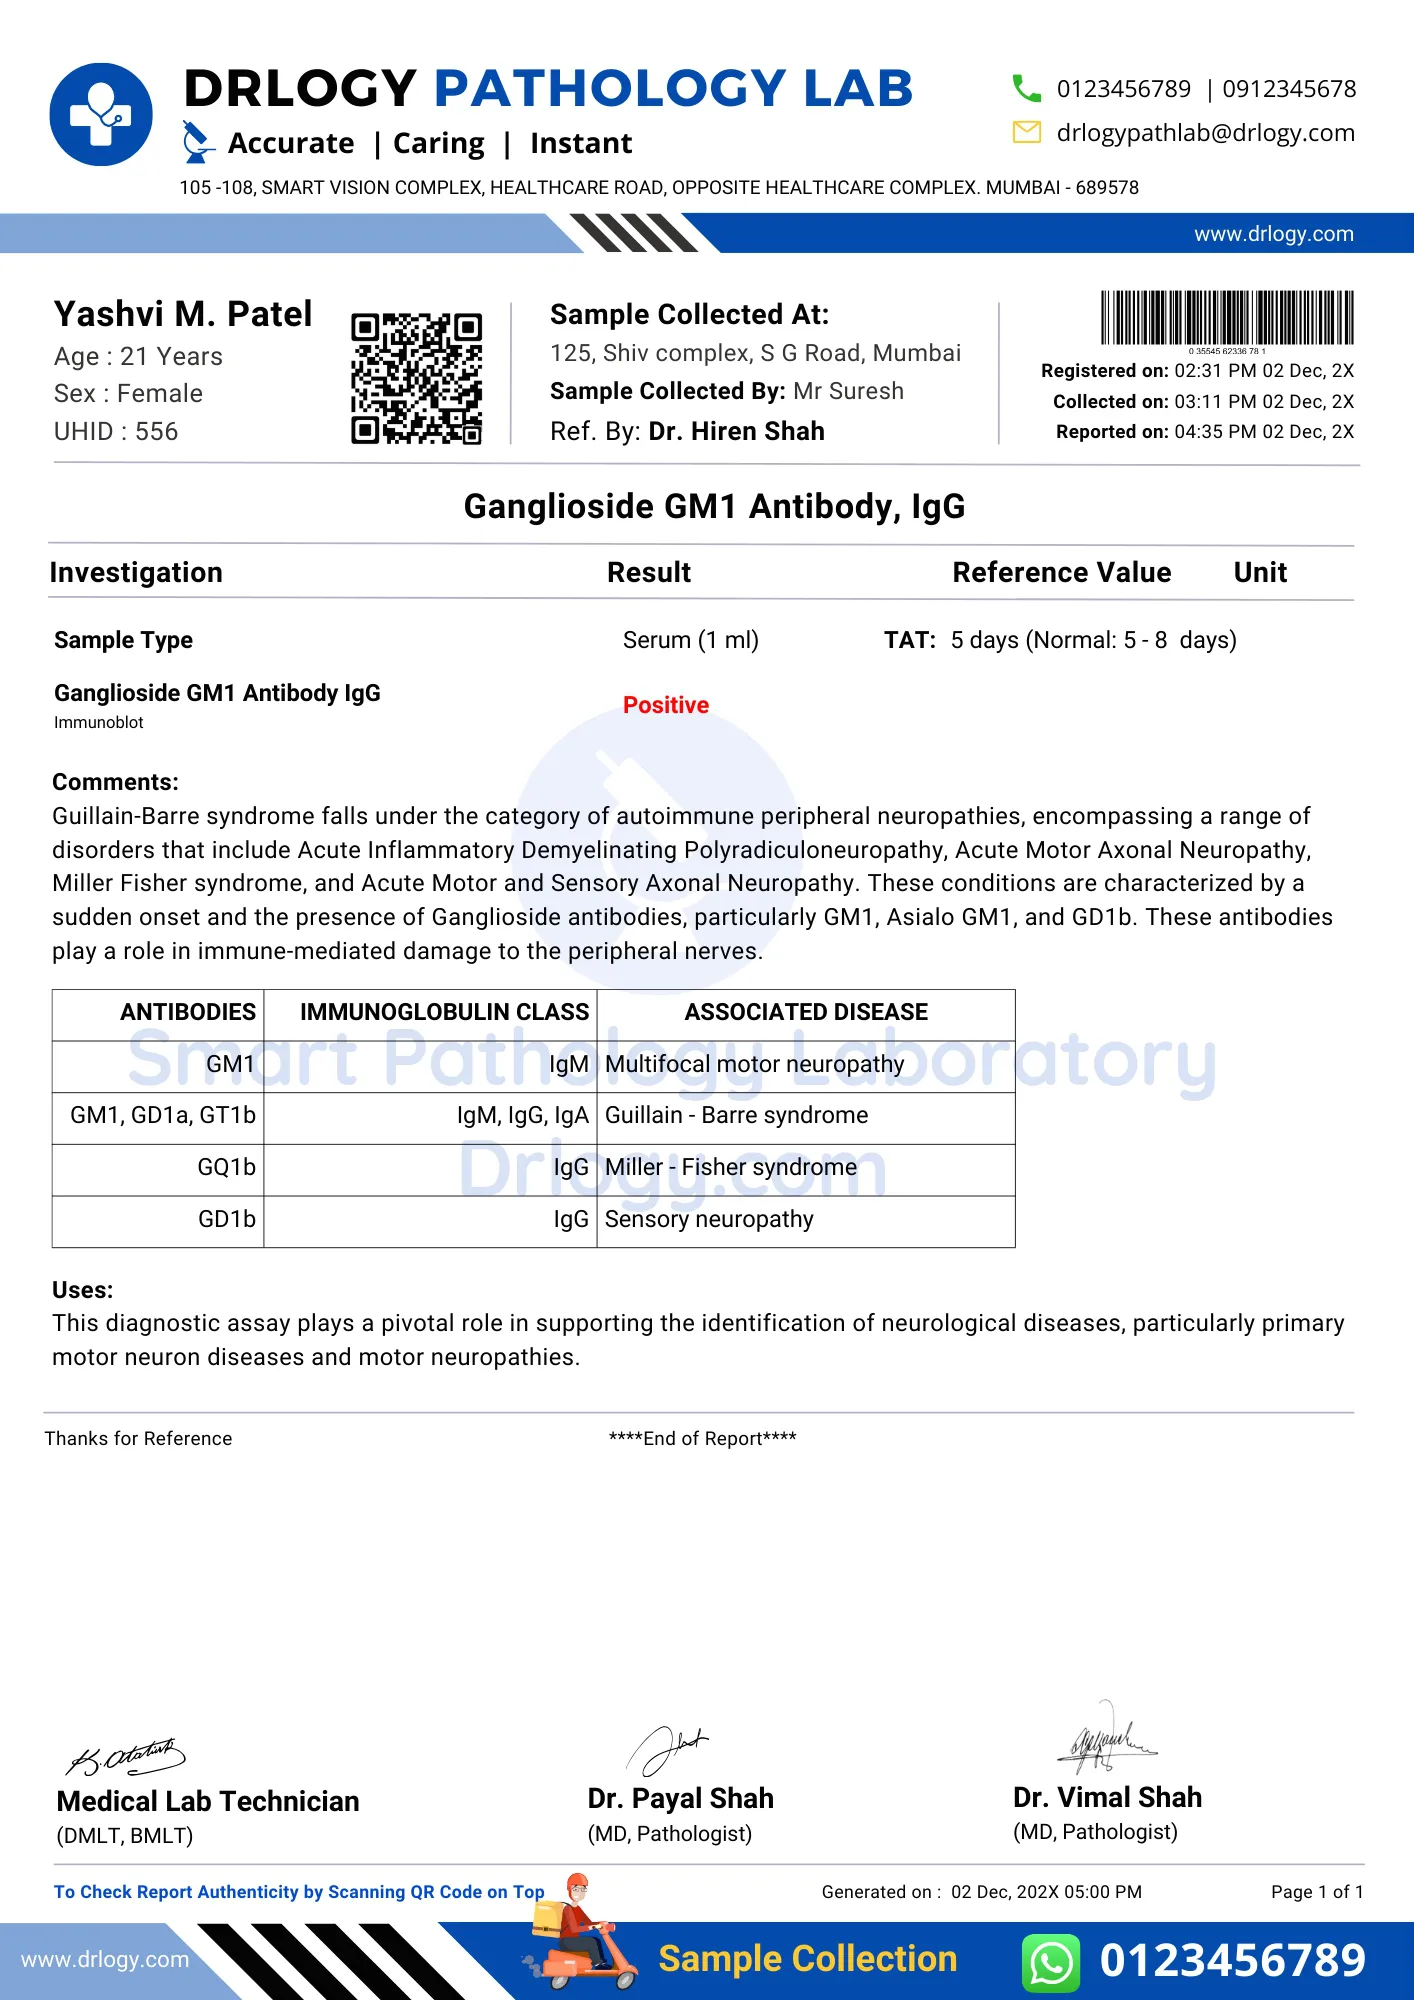
GM1 Antibody IgG Test Positive Report Format Sample
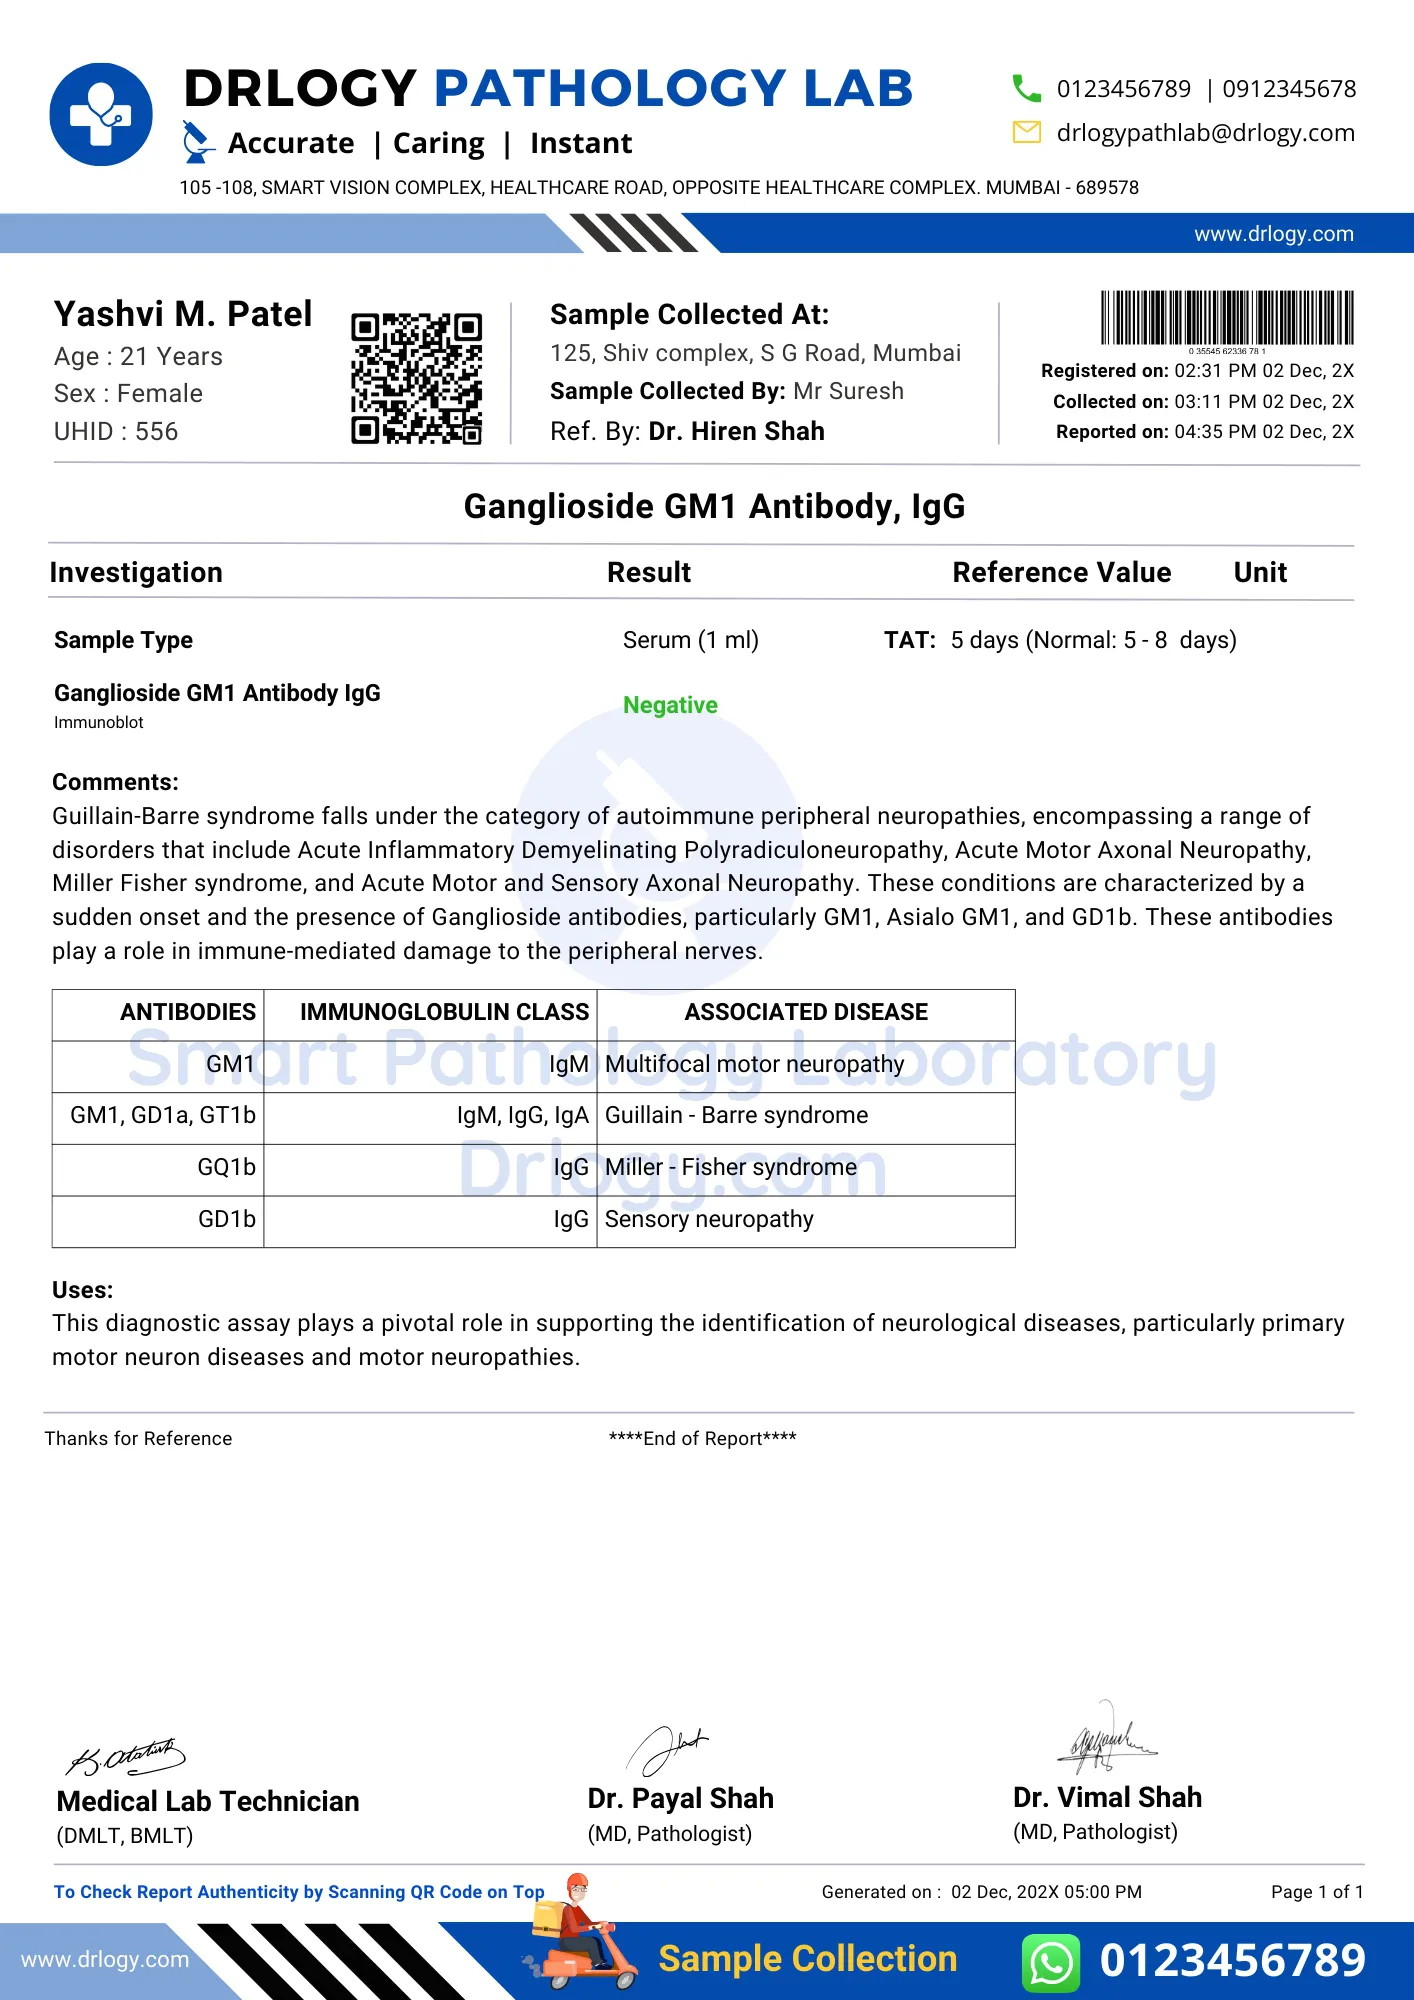
GM1 Antibody IgG Test Negative Report Format Sample
GM1 Antibody IgG Test Report Format
Here is a GM1 Antibody IgG test report PDF format, highlighting its significance in the pathology laboratory.
Ganglioside GM1 Antibody IgG Test Positive Result Report Format PDF
Ganglioside GM1 Antibody IgG Test Negative Result Report Format PDF
Drlogy Pathology lab software plays a pivotal in ensuring a GM1 Antibody IgG Test Report Format. Additionally, Pathology lab software automates many aspects of the testing process, from sample handling to data analysis. Drlogy Pathology Software provides healthcare providers with real-time access to GM1 Antibody IgG test results, enabling timely decision-making and faster patient care.
Referred
Conclusion
- In conclusion, the Ganglioside GM1 Antibody IgG Test is indispensable for precise diagnosis in neurology.
- The standardized report format ensures clarity and facilitates effective communication between healthcare professionals, enabling timely interventions and enhancing patient care in the realm of neurological and autoimmune diseases.
- Drlogy Plus For Complete Digital Solutions for Doctors, Clinics, Hospitals & Labs to Enhance Patient Experience.
Reference